Tutorials - Revit Architecture and 3D

Tuesday, December 23, 2008

How to make Walls?

After we’ve made the floor, now it’s time to make walls.
Walls are essential part of the project and they are as easily built as floors.
The Wall instrument is in basic menu of toolbar panel, click on it and now a new parameters box emerges. This parameter box is the same like floors, but first you need to choose in which level you want to put the walls, so click level 1 and in this level we’ll make it. You can choose 3 types of wall making: draw, pick lines and pick faces. If you click on draw you can draw a custom wall design, but if you already have floor and you need the walls to step right on it you must choose pick lines, and 3rd type is pick faces If we have any model with face you can choose pick faces and make wall by the face of the model. After choosing what type you need next thing is to set up the height. You can change the height from the height button. It is automatic switch to level two that means that walls’ height will be limited from levels height, but if you want to make it as you want switch to unconnected and type the desire height. Lock line means, how to lock the walls (wall centerline, core centerline, finish face: exterior, finish face: interior, core face: interior and core face: exterior). Mark chain to have a chain of walls when you are ready with the chain simply click right mouse button and choose cancel. If you want to make a custom wall design you can manipulate with the walls method it is the same like floors, but if you pick lines’ type you wouldn’t have the opportunity to use method. And in this parameters box you can change the offset, by typing desired dimensions. You can change the parameters (height, thickness, materials and etc.) in the walls properties button.


If you want to see your project in 3D you need to click the 3d button. In 3D you can rotate your model by the cube ot clich the scroller of your mouse and hold shift. You can change the model style form wireframe to shading with eges. So there you go you know how to make walls, we'll learn how to make doors in the next leason.

Monday, December 22, 2008

How to make floors?

First thing you need to do when you'll make some project is floor. So the first instrument is floor.
Let's begin.
You need to go to Basic and then choose floors. When you choose floor, the new window opnes.
This is floor's settings and now we are in floor's sketch.

Chose Lines, then mark chain, choose line as the method of making it and start making your own floor.


We've chosen line, beacause we don't have any walls to choose to make the floor.As you can se we've choosen the line method, but we can make rectangle, circle, arc and etc. just click and you'll see.


When you are ready with the sketch of the floor, you need to change its properties so you need to go to Floor propreries and click edit/new. You can make new type of floor or chnage the settings of your currnet floor type. So click the button as the image shown.


In the new window you can make new type by clicking duplicate and type your desir name and click ok, but if you want to change the paramets of the floor click edit


In the new window you can edit the current settings. You sse layers with settings -the materials, function, thicness, wraps and varibles settings. In function you can set the core boundery when you choose 1 it set the highest priority to this material, in material you can change to the desir material, concrete, wood, brick and so on, and you can make the thickness of the materials as whether you like it.
You can insert new layer (e.g. if you want to have a thin layer of isolation) by clicking insert


The floor properties are the same, like every other instrumate (e.g. wall, door, windws) and you can change the parameters or make new type.

How to make Levels and Elevations?

In Revit Architecture you can make as many levels as you want.
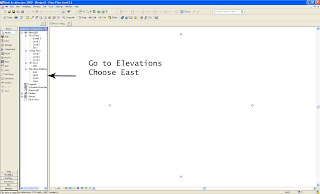
But first you need to learn where are the elevations views, because in the you can make the levels. Go to Project Browser and move to Elevations and choose East, North, South, West elevations view. Just like the image:


After clicking it you'll see something like this.


This is east Elevations view. You have that four elevations, east, west, north, south. Now You can see that there are 3 levels at distance 280 cm one of another. If you want to make a new Level. Choose level from Basic menu and then go to third level and move upwards the mouse up to 280 cm like the image I've shown. When you have the desire distance click with the left button of the mouse and drag to the right until it pop up a vertical line which indicates thah the level is aligned with the others. And there you go, now you know how to make levels and how to see the elevations ot the project (house, building and etc.)


And If you want to make some chanege of the hight of the floor.

Click at the floor and then change the distance:

Let's Begin

First of all we are going to understand Revit's Interface.

As you can see I marked the most importain panels of Revit's interface.
Most importain is Toolbar. It's the beginning and the end of every project. The toolbar consist 10 menus: basic, view, modeling, drafting, rendering, site, massing, room and area, structural and construction. If you don't see the whole 10 menus, don't worry you can switch them on simply by right click at the Toolbar and chose it or go to Window > Toolbar and click the one that isn't there.
Second panel is - Project Browser. It is divided at Floor plans, Celing plans, 3d Views, Elevation, Familes and Group. If you can see it simply go to Window> Project Browser.
In Status Bar you can change the scale, change the look of your project, reveal and hide objects.
In the Command Line you can manipulate with the objects.
Let's go further in the panels.
Most importan menus in Toolbar panel are Basic, View, Modeling, Massing, Rendering and Site.
In Basic menu you can make walls, floors, doors, windwos, selections and etc.
In View you can make elevations, sections put camera and so on.
In Modeling you can make roofs, celling, ralling, curtains system, wall, door,window they are the same like in Basic there is no difference between them.
In massing you can make complex and sophisticated obejects.
You can Render the project and change the render settings in Render Menu.
If you want terrains, you can easily make and manipulate them in Site Menu.
Further in my Tutorials I'll stop and explain every component of the panels.
The other importain thing is to have correct and exact dimension. You can go to Settings> Project Units. In the new windows you change the length format (centimeters, meters, inch and etc.) and the other formats whether you like it.
That's for the Interface :)

Saturday, December 13, 2008

About Revit Architecture

Autodesk Revit is Building Information Modeling software for Microsoft Windows, currently developed by Autodesk, which allows the user to design with parametric modeling and drafting elements. Building Information Modeling is a new Computer Aided Design (CAD) paradigm that allows for intelligent, 3D and parametric object-based design. In this way, Revit provides full bi-directional associativity. A change anywhere is a change everywhere, instantly, with no user interaction to manually update any view. A BIM model contains the building's full life cycle, from concept to construction to decommissioning. This is made possible by Revit's underlying relational database architecture which its creators call the parametric change engine.