Let's Begin
First of all we are going to understand Revit's Interface.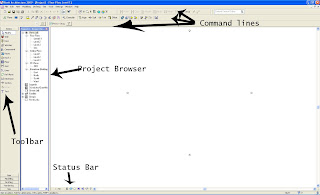
As you can see I marked the most importain panels of Revit's interface.
Most importain is Toolbar. It's the beginning and the end of every project. The toolbar consist 10 menus: basic, view, modeling, drafting, rendering, site, massing, room and area, structural and construction. If you don't see the whole 10 menus, don't worry you can switch them on simply by right click at the Toolbar and chose it or go to Window > Toolbar and click the one that isn't there.
Second panel is - Project Browser. It is divided at Floor plans, Celing plans, 3d Views, Elevation, Familes and Group. If you can see it simply go to Window> Project Browser.
In Status Bar you can change the scale, change the look of your project, reveal and hide objects.
In the Command Line you can manipulate with the objects.
Let's go further in the panels.
Most importan menus in Toolbar panel are Basic, View, Modeling, Massing, Rendering and Site.
In Basic menu you can make walls, floors, doors, windwos, selections and etc.
In View you can make elevations, sections put camera and so on.
In Modeling you can make roofs, celling, ralling, curtains system, wall, door,window they are the same like in Basic there is no difference between them.
In massing you can make complex and sophisticated obejects.
You can Render the project and change the render settings in Render Menu.
If you want terrains, you can easily make and manipulate them in Site Menu.
Further in my Tutorials I'll stop and explain every component of the panels.
The other importain thing is to have correct and exact dimension. You can go to Settings> Project Units. In the new windows you change the length format (centimeters, meters, inch and etc.) and the other formats whether you like it.
That's for the Interface :)
posted by Aleksandar at
3:12 PM
![]()


0 Comments:
Post a Comment
Subscribe to Post Comments [Atom]
<< Home